
Reaper

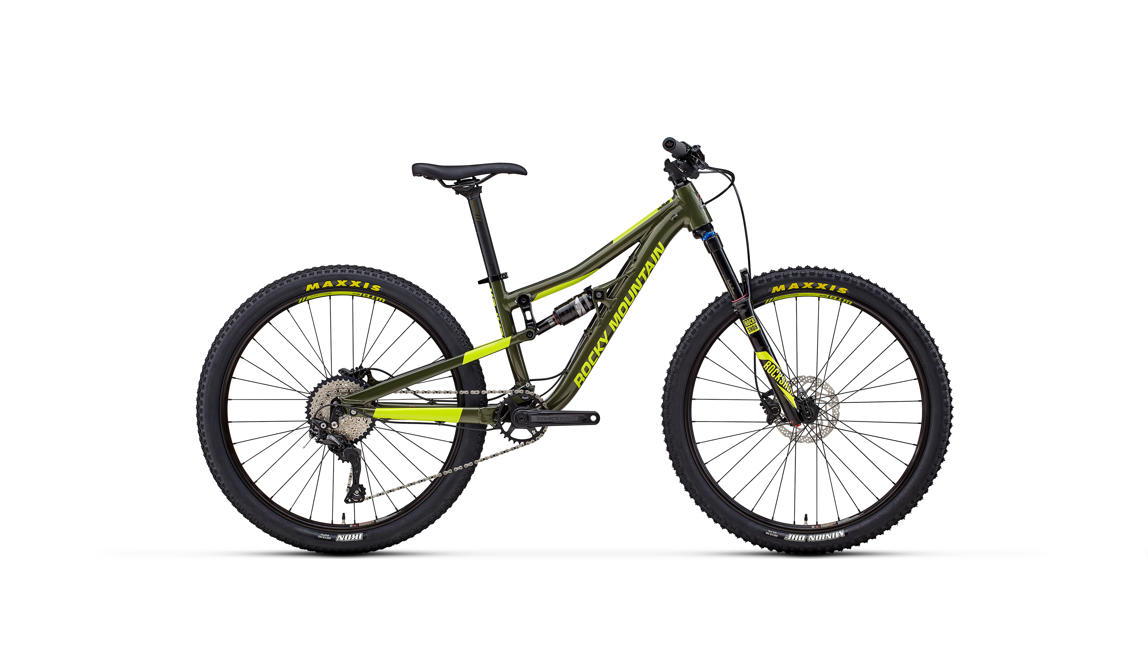
Specifications: Reaper 24
-
- Frame FORM™ Alloy. BC2™ / ABC™ Pivots. Full Sealed Cartridge Bearing Main Pivot. Press Fit BB. RIDE-9™ Adjustable Geometry + Suspension Rate. FORM™ Rear Triangle
- Sizes One Size
- Fork RockShox Reba RL 120mm
- Front Travel 120 mm
- Shock RockShox Monarch Debonair R
- Rear Travel 130 mm
- Headset FSA No. 57B
- Stem Rocky Mountain AM
- Handlebar Rocky Mountain XC 720mm
- Grips Rocky Mountain Lock On Light
- Brakes Shimano MT500
- Shifters Shimano Deore
-
- Rear Derailleur Shimano Deore
- Cranks & Chainrings Race Face Aeffect Cinch 30T Steel
- Bottom Bracket Race Face BB92
- Cassette Shimano HG-500 11-42T
- Chain KMC X10-1
- Front Hub Shimano M618 15mm
- Rear Hub Shimano M615
- Spokes 2.0 Stainless
- Rims WTB SX19
- Tires Maxxis Minion DHF Folding 26 x 2.35 / Maxxis Ikon Folding 26 x 2.2
- Seatpost Rocky Mountain SL 30.9mm
- Saddle WTB Volt
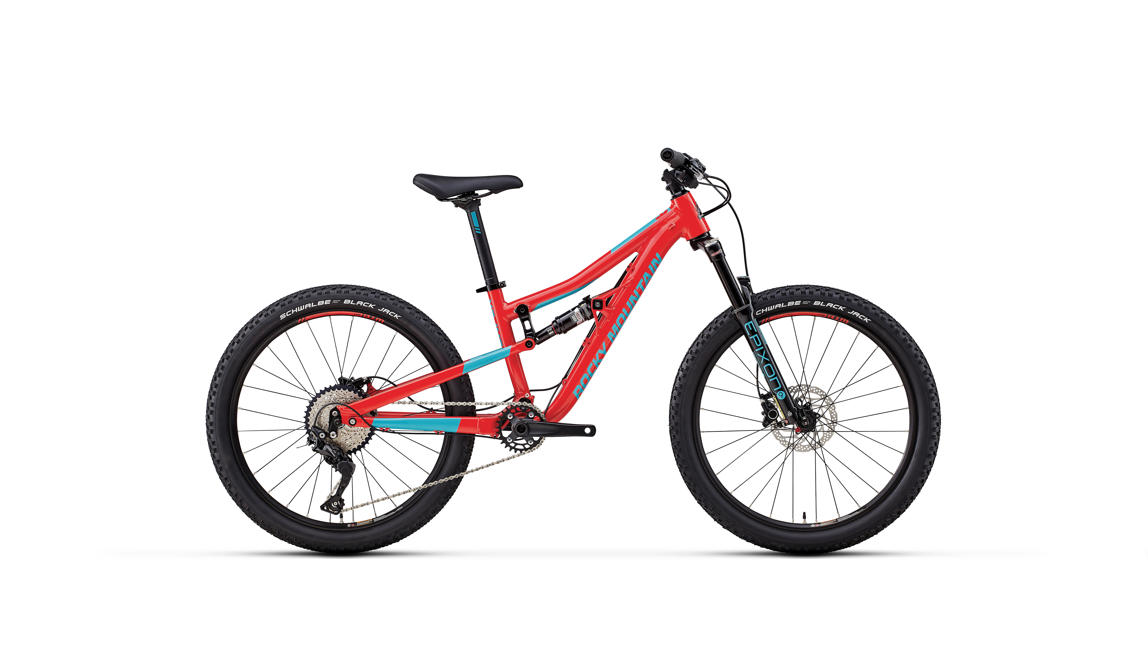
-
- Frame FORM™ Alloy. BC2™ / ABC™ Pivots. Full Sealed Cartridge Bearing Main Pivot. Press Fit BB. RIDE-9™ Adjustable Geometry + Suspension Rate. FORM™ Rear Triangle
- Sizes One Size
- Fork Suntour Epixon LO DS 120mm
- Front Travel 120 mm
- Shock RockShox Monarch R
- Rear Travel 130 mm
- Headset FSA No. 57B-1
- Stem Rocky Mountain AM
- Handlebar Rocky Mountain XC 720mm
- Grips Rocky Mountain Lock On Light
- Brakes Shimano M365
- Shifters Shimano Deore
-
- Rear Derailleur Shimano Deore
- Cranks & Chainrings Rocky Mountain Microdrive 2PC 28T
- Bottom Bracket Rocky Mountain Sealed BB92 - Shimano Compatible
- Cassette Shimano HG-500 11-42T
- Chain KMC X10-1
- Front Hub Rocky Mountain QR
- Rear Hub Rocky Mountain QR
- Spokes 2.0 Stainless
- Rims WTB SX17
- Tires Schwalbe Black Jack 24 x 2.1 / Schwalbe Black Jack 24 x 2.1
- Seatpost Rocky Mountain SL 30.9mm
- Saddle Rocky Mountain Kids
We make every effort to ensure accuracy, but reserve the right to update specifications & prices without notification
Geometry: Reaper 24
Riding Style
| xs | |
|---|---|
|
|
|
| TTH Top Tube Length - HORZ | 504 504mm |
| HTA Head Tube Angle | 64.3 64.3deg |
| HTL Head Tube length | 100 100mm |
| STA Seat Tube Angle - Effective | 75 75deg |
| STL Seat Tube length | 329 329mm |
| RC Rear Centre | 422 422mm |
| BBD Bottom bracket drop | 23 23mm |
| R Reach | 359 359mm |
| S Stack | 543 543mm |
| *SH Standover Height | 739 739mm |
| WB Wheelbase | 1,075 1,075mm |
| xs | |
|---|---|
|
|
|
| TTH Top Tube Length - HORZ | 503 503mm |
| HTA Head Tube Angle | 64.7 64.7deg |
| HTL Head Tube length | 100 100mm |
| STA Seat Tube Angle - Effective | 75.5 75.5deg |
| STL Seat Tube length | 329 329mm |
| RC Rear Centre | 421 421mm |
| BBD Bottom bracket drop | 18 18mm |
| R Reach | 363 363mm |
| S Stack | 540 540mm |
| *SH Standover Height | 740 740mm |
| WB Wheelbase | 1,074 1,074mm |
| xs | |
|---|---|
|
|
|
| TTH Top Tube Length - HORZ | 503 503mm |
| HTA Head Tube Angle | 65 65deg |
| HTL Head Tube length | 100 100mm |
| STA Seat Tube Angle - Effective | 75.7 75.7deg |
| STL Seat Tube length | 329 329mm |
| RC Rear Centre | 421 421mm |
| BBD Bottom bracket drop | 15 15mm |
| R Reach | 366 366mm |
| S Stack | 538 538mm |
| *SH Standover Height | 741 741mm |
| WB Wheelbase | 1,074 1,074mm |
| xs | |
|---|---|
|
|
|
| TTH Top Tube Length - HORZ | 502 502mm |
| HTA Head Tube Angle | 65.1 65.1deg |
| HTL Head Tube length | 100 100mm |
| STA Seat Tube Angle - Effective | 75.9 75.9deg |
| STL Seat Tube length | 329 329mm |
| RC Rear Centre | 420 420mm |
| BBD Bottom bracket drop | 13 13mm |
| R Reach | 367 367mm |
| S Stack | 538 538mm |
| *SH Standover Height | 742 742mm |
| WB Wheelbase | 1,073 1,073mm |
| xs | |
|---|---|
|
|
|
| TTH Top Tube Length - HORZ | 501 501mm |
| HTA Head Tube Angle | 65.4 65.4deg |
| HTL Head Tube length | 100 100mm |
| STA Seat Tube Angle - Effective | 76.1 76.1deg |
| STL Seat Tube length | 329 329mm |
| RC Rear Centre | 420 420mm |
| BBD Bottom bracket drop | 10 10mm |
| R Reach | 370 370mm |
| S Stack | 536 536mm |
| *SH Standover Height | 742 742mm |
| WB Wheelbase | 1,073 1,073mm |
| xs | |
|---|---|
|
|
|
| TTH Top Tube Length - HORZ | 501 501mm |
| HTA Head Tube Angle | 65.7 65.7deg |
| HTL Head Tube length | 100 100mm |
| STA Seat Tube Angle - Effective | 76.4 76.4deg |
| STL Seat Tube length | 329 329mm |
| RC Rear Centre | 419 419mm |
| BBD Bottom bracket drop | 7 7mm |
| R Reach | 372 372mm |
| S Stack | 534 534mm |
| *SH Standover Height | 743 743mm |
| WB Wheelbase | 1,072 1,072mm |
| xs | |
|---|---|
|
|
|
| TTH Top Tube Length - HORZ | 500 500mm |
| HTA Head Tube Angle | 65.8 65.8deg |
| HTL Head Tube length | 100 100mm |
| STA Seat Tube Angle - Effective | 76.6 76.6deg |
| STL Seat Tube length | 329 329mm |
| RC Rear Centre | 419 419mm |
| BBD Bottom bracket drop | 5 5mm |
| R Reach | 374 374mm |
| S Stack | 533 533mm |
| *SH Standover Height | 744 744mm |
| WB Wheelbase | 1,072 1,072mm |
| xs | |
|---|---|
|
|
|
| TTH Top Tube Length - HORZ | 500 500mm |
| HTA Head Tube Angle | 66.1 66.1deg |
| HTL Head Tube length | 100 100mm |
| STA Seat Tube Angle - Effective | 76.9 76.9deg |
| STL Seat Tube length | 329 329mm |
| RC Rear Centre | 418 418mm |
| BBD Bottom bracket drop | 2 2mm |
| R Reach | 376 376mm |
| S Stack | 531 531mm |
| *SH Standover Height | 744 744mm |
| WB Wheelbase | 1,072 1,072mm |
| xs | |
|---|---|
|
|
|
| TTH Top Tube Length - HORZ | 499 499mm |
| HTA Head Tube Angle | 66.5 66.5deg |
| HTL Head Tube length | 100 100mm |
| STA Seat Tube Angle - Effective | 77.3 77.3deg |
| STL Seat Tube length | 329 329mm |
| RC Rear Centre | 417 417mm |
| BBD Bottom bracket drop | -3 -3mm |
| R Reach | 380 380mm |
| S Stack | 529 529mm |
| *SH Standover Height | 746 746mm |
| WB Wheelbase | 1,071 1,071mm |
| xxs | |
|---|---|
|
|
|
| TTH Top Tube Length - HORZ | 504 504mm |
| HTA Head Tube Angle | 64.3 64.3deg |
| HTL Head Tube length | 100 100mm |
| STA Seat Tube Angle - Effective | 75 75deg |
| STL Seat Tube length | 329 329mm |
| RC Rear Centre | 422 422mm |
| BBD Bottom bracket drop | 23 23mm |
| R Reach | 359 359mm |
| S Stack | 543 543mm |
| *SH Standover Height | 704 704mm |
| WB Wheelbase | 1,075 1,075mm |
| xxs | |
|---|---|
|
|
|
| TTH Top Tube Length - HORZ | 503 503mm |
| HTA Head Tube Angle | 64.7 64.7deg |
| HTL Head Tube length | 100 100mm |
| STA Seat Tube Angle - Effective | 75.5 75.5deg |
| STL Seat Tube length | 329 329mm |
| RC Rear Centre | 421 421mm |
| BBD Bottom bracket drop | 18 18mm |
| R Reach | 363 363mm |
| S Stack | 540 540mm |
| *SH Standover Height | 705 705mm |
| WB Wheelbase | 1,074 1,074mm |
| xxs | |
|---|---|
|
|
|
| TTH Top Tube Length - HORZ | 503 503mm |
| HTA Head Tube Angle | 65 65deg |
| HTL Head Tube length | 100 100mm |
| STA Seat Tube Angle - Effective | 75.7 75.7deg |
| STL Seat Tube length | 329 329mm |
| RC Rear Centre | 421 421mm |
| BBD Bottom bracket drop | 15 15mm |
| R Reach | 366 366mm |
| S Stack | 538 538mm |
| *SH Standover Height | 706 706mm |
| WB Wheelbase | 1,074 1,074mm |
| xxs | |
|---|---|
|
|
|
| TTH Top Tube Length - HORZ | 502 502mm |
| HTA Head Tube Angle | 65.1 65.1deg |
| HTL Head Tube length | 100 100mm |
| STA Seat Tube Angle - Effective | 75.9 75.9deg |
| STL Seat Tube length | 329 329mm |
| RC Rear Centre | 420 420mm |
| BBD Bottom bracket drop | 13 13mm |
| R Reach | 367 367mm |
| S Stack | 538 538mm |
| *SH Standover Height | 707 707mm |
| WB Wheelbase | 1,073 1,073mm |
| xxs | |
|---|---|
|
|
|
| TTH Top Tube Length - HORZ | 501 501mm |
| HTA Head Tube Angle | 65.4 65.4deg |
| HTL Head Tube length | 100 100mm |
| STA Seat Tube Angle - Effective | 76.1 76.1deg |
| STL Seat Tube length | 329 329mm |
| RC Rear Centre | 420 420mm |
| BBD Bottom bracket drop | 10 10mm |
| R Reach | 370 370mm |
| S Stack | 536 536mm |
| *SH Standover Height | 707 707mm |
| WB Wheelbase | 1,073 1,073mm |
| xxs | |
|---|---|
|
|
|
| TTH Top Tube Length - HORZ | 501 501mm |
| HTA Head Tube Angle | 65.7 65.7deg |
| HTL Head Tube length | 100 100mm |
| STA Seat Tube Angle - Effective | 76.4 76.4deg |
| STL Seat Tube length | 329 329mm |
| RC Rear Centre | 419 419mm |
| BBD Bottom bracket drop | 7 7mm |
| R Reach | 372 372mm |
| S Stack | 534 534mm |
| *SH Standover Height | 708 708mm |
| WB Wheelbase | 1,072 1,072mm |
| xxs | |
|---|---|
|
|
|
| TTH Top Tube Length - HORZ | 500 500mm |
| HTA Head Tube Angle | 65.8 65.8deg |
| HTL Head Tube length | 100 100mm |
| STA Seat Tube Angle - Effective | 76.6 76.6deg |
| STL Seat Tube length | 329 329mm |
| RC Rear Centre | 419 419mm |
| BBD Bottom bracket drop | 5 5mm |
| R Reach | 374 374mm |
| S Stack | 533 533mm |
| *SH Standover Height | 709 709mm |
| WB Wheelbase | 1,072 1,072mm |
| xxs | |
|---|---|
|
|
|
| TTH Top Tube Length - HORZ | 500 500mm |
| HTA Head Tube Angle | 66.1 66.1deg |
| HTL Head Tube length | 100 100mm |
| STA Seat Tube Angle - Effective | 76.9 76.9deg |
| STL Seat Tube length | 329 329mm |
| RC Rear Centre | 418 418mm |
| BBD Bottom bracket drop | 2 2mm |
| R Reach | 376 376mm |
| S Stack | 531 531mm |
| *SH Standover Height | 709 709mm |
| WB Wheelbase | 1,072 1,072mm |
| xxs | |
|---|---|
|
|
|
| TTH Top Tube Length - HORZ | 499 499mm |
| HTA Head Tube Angle | 66.5 66.5deg |
| HTL Head Tube length | 100 100mm |
| STA Seat Tube Angle - Effective | 77.3 77.3deg |
| STL Seat Tube length | 329 329mm |
| RC Rear Centre | 417 417mm |
| BBD Bottom bracket drop | -3 -3mm |
| R Reach | 380 380mm |
| S Stack | 529 529mm |
| *SH Standover Height | 711 711mm |
| WB Wheelbase | 1,071 1,071mm |
| xs | |
|---|---|
|
|
|
| TTH Top Tube Length - HORZ | 504 504mm |
| HTA Head Tube Angle | 64.3 64.3deg |
| HTL Head Tube length | 100 100mm |
| STA Seat Tube Angle - Effective | 75 75deg |
| STL Seat Tube length | 329 329mm |
| RC Rear Centre | 422 422mm |
| BBD Bottom bracket drop | 23 23mm |
| R Reach | 359 359mm |
| S Stack | 543 543mm |
| *SH Standover Height | 739 739mm |
| WB Wheelbase | 1,075 1,075mm |
| xs | |
|---|---|
|
|
|
| TTH Top Tube Length - HORZ | 503 503mm |
| HTA Head Tube Angle | 64.7 64.7deg |
| HTL Head Tube length | 100 100mm |
| STA Seat Tube Angle - Effective | 75.5 75.5deg |
| STL Seat Tube length | 329 329mm |
| RC Rear Centre | 421 421mm |
| BBD Bottom bracket drop | 18 18mm |
| R Reach | 363 363mm |
| S Stack | 540 540mm |
| *SH Standover Height | 740 740mm |
| WB Wheelbase | 1,074 1,074mm |
| xs | |
|---|---|
|
|
|
| TTH Top Tube Length - HORZ | 503 503mm |
| HTA Head Tube Angle | 65 65deg |
| HTL Head Tube length | 100 100mm |
| STA Seat Tube Angle - Effective | 75.7 75.7deg |
| STL Seat Tube length | 329 329mm |
| RC Rear Centre | 421 421mm |
| BBD Bottom bracket drop | 15 15mm |
| R Reach | 366 366mm |
| S Stack | 538 538mm |
| *SH Standover Height | 741 741mm |
| WB Wheelbase | 1,074 1,074mm |
| xs | |
|---|---|
|
|
|
| TTH Top Tube Length - HORZ | 502 502mm |
| HTA Head Tube Angle | 65.1 65.1deg |
| HTL Head Tube length | 100 100mm |
| STA Seat Tube Angle - Effective | 75.9 75.9deg |
| STL Seat Tube length | 329 329mm |
| RC Rear Centre | 420 420mm |
| BBD Bottom bracket drop | 13 13mm |
| R Reach | 367 367mm |
| S Stack | 538 538mm |
| *SH Standover Height | 742 742mm |
| WB Wheelbase | 1,073 1,073mm |
| xs | |
|---|---|
|
|
|
| TTH Top Tube Length - HORZ | 501 501mm |
| HTA Head Tube Angle | 65.4 65.4deg |
| HTL Head Tube length | 100 100mm |
| STA Seat Tube Angle - Effective | 76.1 76.1deg |
| STL Seat Tube length | 329 329mm |
| RC Rear Centre | 420 420mm |
| BBD Bottom bracket drop | 10 10mm |
| R Reach | 370 370mm |
| S Stack | 536 536mm |
| *SH Standover Height | 742 742mm |
| WB Wheelbase | 1,073 1,073mm |
| xs | |
|---|---|
|
|
|
| TTH Top Tube Length - HORZ | 501 501mm |
| HTA Head Tube Angle | 65.7 65.7deg |
| HTL Head Tube length | 100 100mm |
| STA Seat Tube Angle - Effective | 76.4 76.4deg |
| STL Seat Tube length | 329 329mm |
| RC Rear Centre | 419 419mm |
| BBD Bottom bracket drop | 7 7mm |
| R Reach | 372 372mm |
| S Stack | 534 534mm |
| *SH Standover Height | 743 743mm |
| WB Wheelbase | 1,072 1,072mm |
| xs | |
|---|---|
|
|
|
| TTH Top Tube Length - HORZ | 500 500mm |
| HTA Head Tube Angle | 65.8 65.8deg |
| HTL Head Tube length | 100 100mm |
| STA Seat Tube Angle - Effective | 76.6 76.6deg |
| STL Seat Tube length | 329 329mm |
| RC Rear Centre | 419 419mm |
| BBD Bottom bracket drop | 5 5mm |
| R Reach | 374 374mm |
| S Stack | 533 533mm |
| *SH Standover Height | 744 744mm |
| WB Wheelbase | 1,072 1,072mm |
| xs | |
|---|---|
|
|
|
| TTH Top Tube Length - HORZ | 500 500mm |
| HTA Head Tube Angle | 66.1 66.1deg |
| HTL Head Tube length | 100 100mm |
| STA Seat Tube Angle - Effective | 76.9 76.9deg |
| STL Seat Tube length | 329 329mm |
| RC Rear Centre | 418 418mm |
| BBD Bottom bracket drop | 2 2mm |
| R Reach | 376 376mm |
| S Stack | 531 531mm |
| *SH Standover Height | 744 744mm |
| WB Wheelbase | 1,072 1,072mm |
| xs | |
|---|---|
|
|
|
| TTH Top Tube Length - HORZ | 499 499mm |
| HTA Head Tube Angle | 66.5 66.5deg |
| HTL Head Tube length | 100 100mm |
| STA Seat Tube Angle - Effective | 77.3 77.3deg |
| STL Seat Tube length | 329 329mm |
| RC Rear Centre | 417 417mm |
| BBD Bottom bracket drop | -3 -3mm |
| R Reach | 380 380mm |
| S Stack | 529 529mm |
| *SH Standover Height | 746 746mm |
| WB Wheelbase | 1,071 1,071mm |
| xxs | |
|---|---|
|
|
|
| TTH Top Tube Length - HORZ | 504 504mm |
| HTA Head Tube Angle | 64.3 64.3deg |
| HTL Head Tube length | 100 100mm |
| STA Seat Tube Angle - Effective | 75 75deg |
| STL Seat Tube length | 329 329mm |
| RC Rear Centre | 422 422mm |
| BBD Bottom bracket drop | 23 23mm |
| R Reach | 359 359mm |
| S Stack | 543 543mm |
| *SH Standover Height | 704 704mm |
| WB Wheelbase | 1,075 1,075mm |
| xxs | |
|---|---|
|
|
|
| TTH Top Tube Length - HORZ | 503 503mm |
| HTA Head Tube Angle | 64.7 64.7deg |
| HTL Head Tube length | 100 100mm |
| STA Seat Tube Angle - Effective | 75.5 75.5deg |
| STL Seat Tube length | 329 329mm |
| RC Rear Centre | 421 421mm |
| BBD Bottom bracket drop | 18 18mm |
| R Reach | 363 363mm |
| S Stack | 540 540mm |
| *SH Standover Height | 705 705mm |
| WB Wheelbase | 1,074 1,074mm |
| xxs | |
|---|---|
|
|
|
| TTH Top Tube Length - HORZ | 503 503mm |
| HTA Head Tube Angle | 65 65deg |
| HTL Head Tube length | 100 100mm |
| STA Seat Tube Angle - Effective | 75.7 75.7deg |
| STL Seat Tube length | 329 329mm |
| RC Rear Centre | 421 421mm |
| BBD Bottom bracket drop | 15 15mm |
| R Reach | 366 366mm |
| S Stack | 538 538mm |
| *SH Standover Height | 706 706mm |
| WB Wheelbase | 1,074 1,074mm |
| xxs | |
|---|---|
|
|
|
| TTH Top Tube Length - HORZ | 502 502mm |
| HTA Head Tube Angle | 65.1 65.1deg |
| HTL Head Tube length | 100 100mm |
| STA Seat Tube Angle - Effective | 75.9 75.9deg |
| STL Seat Tube length | 329 329mm |
| RC Rear Centre | 420 420mm |
| BBD Bottom bracket drop | 13 13mm |
| R Reach | 367 367mm |
| S Stack | 538 538mm |
| *SH Standover Height | 707 707mm |
| WB Wheelbase | 1,073 1,073mm |
| xxs | |
|---|---|
|
|
|
| TTH Top Tube Length - HORZ | 501 501mm |
| HTA Head Tube Angle | 65.4 65.4deg |
| HTL Head Tube length | 100 100mm |
| STA Seat Tube Angle - Effective | 76.1 76.1deg |
| STL Seat Tube length | 329 329mm |
| RC Rear Centre | 420 420mm |
| BBD Bottom bracket drop | 10 10mm |
| R Reach | 370 370mm |
| S Stack | 536 536mm |
| *SH Standover Height | 707 707mm |
| WB Wheelbase | 1,073 1,073mm |
| xxs | |
|---|---|
|
|
|
| TTH Top Tube Length - HORZ | 501 501mm |
| HTA Head Tube Angle | 65.7 65.7deg |
| HTL Head Tube length | 100 100mm |
| STA Seat Tube Angle - Effective | 76.4 76.4deg |
| STL Seat Tube length | 329 329mm |
| RC Rear Centre | 419 419mm |
| BBD Bottom bracket drop | 7 7mm |
| R Reach | 372 372mm |
| S Stack | 534 534mm |
| *SH Standover Height | 708 708mm |
| WB Wheelbase | 1,072 1,072mm |
| xxs | |
|---|---|
|
|
|
| TTH Top Tube Length - HORZ | 500 500mm |
| HTA Head Tube Angle | 65.8 65.8deg |
| HTL Head Tube length | 100 100mm |
| STA Seat Tube Angle - Effective | 76.6 76.6deg |
| STL Seat Tube length | 329 329mm |
| RC Rear Centre | 419 419mm |
| BBD Bottom bracket drop | 5 5mm |
| R Reach | 374 374mm |
| S Stack | 533 533mm |
| *SH Standover Height | 709 709mm |
| WB Wheelbase | 1,072 1,072mm |
| xxs | |
|---|---|
|
|
|
| TTH Top Tube Length - HORZ | 500 500mm |
| HTA Head Tube Angle | 66.1 66.1deg |
| HTL Head Tube length | 100 100mm |
| STA Seat Tube Angle - Effective | 76.9 76.9deg |
| STL Seat Tube length | 329 329mm |
| RC Rear Centre | 418 418mm |
| BBD Bottom bracket drop | 2 2mm |
| R Reach | 376 376mm |
| S Stack | 531 531mm |
| *SH Standover Height | 709 709mm |
| WB Wheelbase | 1,072 1,072mm |
| xxs | |
|---|---|
|
|
|
| TTH Top Tube Length - HORZ | 499 499mm |
| HTA Head Tube Angle | 66.5 66.5deg |
| HTL Head Tube length | 100 100mm |
| STA Seat Tube Angle - Effective | 77.3 77.3deg |
| STL Seat Tube length | 329 329mm |
| RC Rear Centre | 417 417mm |
| BBD Bottom bracket drop | -3 -3mm |
| R Reach | 380 380mm |
| S Stack | 529 529mm |
| *SH Standover Height | 711 711mm |
| WB Wheelbase | 1,071 1,071mm |
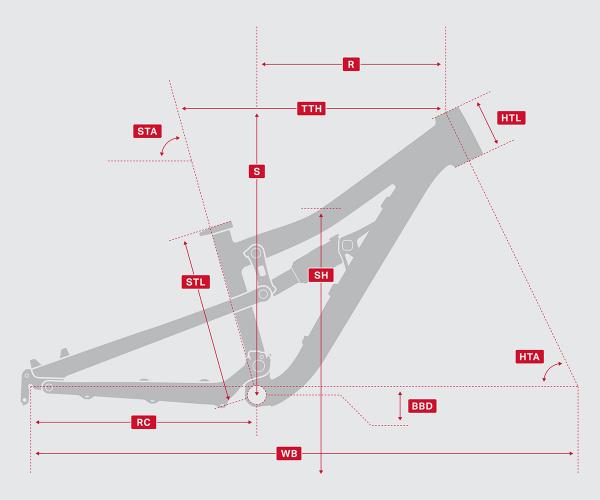
- TTH: Top Tube Length - HORZ
- TTL: Top Tube length - Actual
- HTA: Head Tube Angle
- HTL: Head Tube length
- STA: Seat Tube Angle - Effective
- STL: Seat Tube length
- RC: Rear Centre
- BBD: Bottom bracket drop
- BBH: Bottom bracket height
- R: Reach
- S: Stack
- *SH: Standover Height
- WB: Wheelbase
- FC: Front-Centre
- FO: Fork Offset
*We measure Standover Height 200mm forward from the centre of the bottom bracket. It's measured this way to provide you with the best possible information when looking at frame geometry.
We make every effort to ensure accuracy, but reserve the right to update specifications & prices without notification.
Technologies: Reaper 24
-
-

BC2™ pivots
Frame Construction
Lighter and stiffer than conventional bearing pivots, BC2™ pivots are the next generation of our ABC system. Unlike other bushings, our patented system controls the contact of the bushing surfaces, reducing stiction and binding. BC2™ pivots feature grease ports for effortless maintenance.
-

FORM™ alloy
Frame Construction
FORM™ tubesets utilize premium materials to meet our strict requirements. Each FORM™ tube that we create is engineered for its specific purpose within the frame, ensuring optimized strength, weight, and ride quality.
-

ABC™ pivots
Frame Construction
ABC pivots are light and stiff. Unlike other bushings, our patented system controls the contact of the bushing surfaces, reducing stiction and binding. Their angled bushing surfaces increase their relative contact area, optimizing them for compact locations like chainstay pivots.
-
-
-

RIDE-9 adjustment system
Geometry
The RIDE-9 adjustment system allows riders to quickly fine-tune their geometry and suspension with a pair of Allen keys. Nine configurations are possible thanks to two interlocking chips.
Adjust your RIDE-9 position for geometry before considering suspension effects, or variables like air pressure and shock compression. Make gradual, incremental changes, take notes, and be methodical. Don’t adjust in a hurry before a big ride. Take your time and enjoy the process.
-

Size Specific tune
Suspension
Size Specific Tune ensures that riders of all sizes get the right balance of small-bump compliance, mid-stroke support, and end-stroke progressiveness. Our design team does custom shock tunes based on real world field testing, and adjusts each tune for specific frame sizes.
-

Smoothlink suspension
Suspension
Smoothlink suspension is efficient yet supple when you’re on the pedals and across a wide range of gears. It features a controlled end-stroke and a rate-curve that feels more capable than the travel would suggest. This four-bar suspension design philosophy is centred on ride characteristics; each bike platform we develop balances variables like anti-squat, axle path, chain growth, rate curve, anti-rise, etc. to achieve the legendary Rocky Mountain ride feel.
-
We make every effort to ensure accuracy, but reserve the right to update specifications & prices without notification.
